Calculus
Finding centroids requires a good foundation in calculus, particularly integration. Use this resource to refresh your understanding.
Whenever a force is distributed across a surface, it acts through a single point called the centroid. Finding the centroid tells us where to apply the equivalent resultant force, which we need to analyse structural behaviour. Use this resource to learn how to locate the centroid for simple and composite areas, and explore how Wurundjeri Woi-wurrung people applied an understanding of the underlying physics to make a non-returning boomerang.
The centroid of an area is its geometric centre – the point at which the area would balance perfectly if supported there.
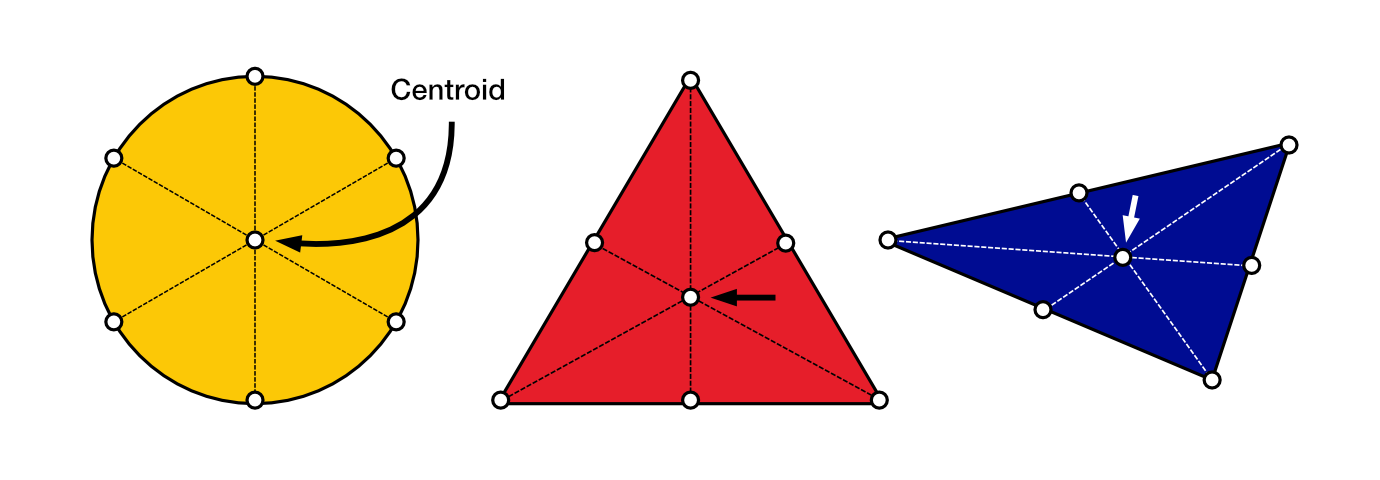
It is found using the first moment of area, the sum (or integral) of each small area element multiplied by its distance from a reference axis. If you have a larger area element far from the axis, it contributes more to this than a smaller element close to the axis. This is why the centroid shifts toward whichever part of the shape has more area.
For a simple area \(A\) bounded by a curve, we use integration to find the centroid.
\[\bar{x} = \frac{\int_{A} \tilde{x}\,dA}{\int_{A}\,dA}, \qquad \bar{y} = \frac{\int_{A} \tilde{y}\,dA}{\int_{A}\,dA},\]
where:
- \(\bar{x}\) and \(\bar{y}\) are the centroidal \(x\) and \(y\) coordinates
- \(\int_{A}\tilde{x}\,dA\) is the first moment of area about the \(x\) axis
- \(\int_{A}\tilde{y}\,dA\) is the first moment of area about the \(y\) axis
- \(\int_{A}\,dA\) is the area.
To find the centroid using integration, we divide the area into infinitely thin strips and find the centroid of each strip. The centroidal coordinates of each infinitesimal strip of area \(dA\) are denoted by \(\tilde{x}\) and \(\tilde{y}\) (with tildes).
The centroid of a horizontal strip (width \(x\) and thickness \(dy\)) is at \(\tilde{x}=\dfrac{x}{2}\) (halfway across) and \(\tilde{y}=y\) (its own height). We integrate these strip centroids, weighted by their areas, to find the overall centroid \(\bar{x}\) and \(\bar{y}\).
The following table helps you understand how to find the area of different shapes, and where the centroid is located.
| Shape | Area \(A\) | Position of centroid |
|---|---|---|
| Circle | \(A=\dfrac{\pi d^{2}}{4}\)
where \(d\) is the diameter of the circle |
At the centre |
| Square | \(A=l^{2}\)
where \(l\) is the length of one side |
At the intersection of the diagonals |
| Rectangle | \(A=bh\)
where \(h\) is the length and \(b\) is the width |
At the intersection of the diagonals |
| Triangle | \(A=\dfrac{bh}{2}\)
where \(b\) is the length of the base and \(h\) is the height |
At the intersection of the medians (\(\tfrac{1}{3}\) of height) |
If you need a refresher on integration, visit this page.
Calculate the centroid \((\bar{x}, \bar{y})\) of the shaded area.
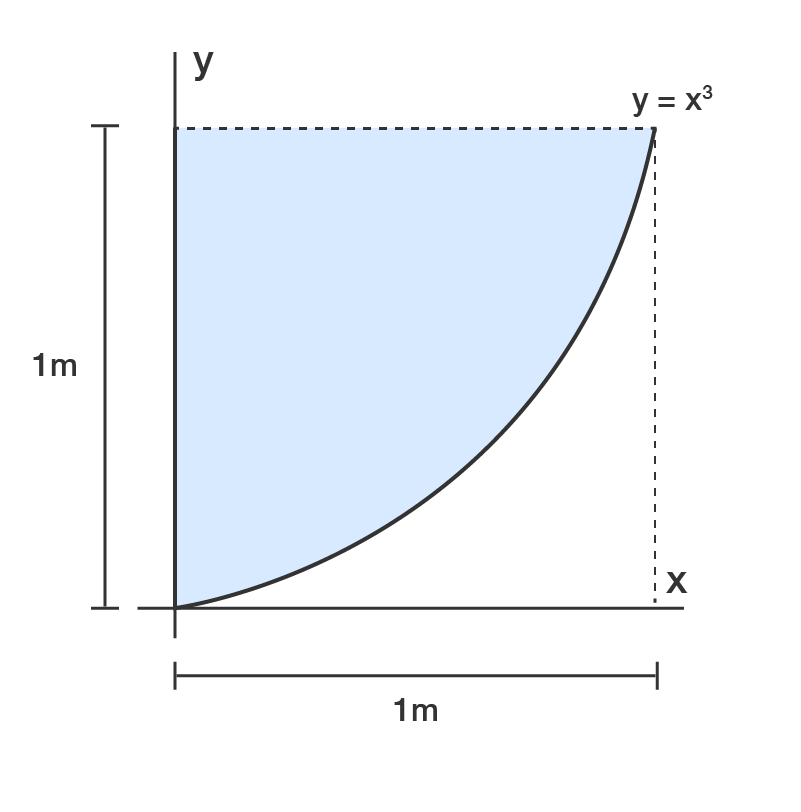
To find the coordinates of the centroid, we need the area. We will choose a horizontal strip of area \(dA = x\,dy\) because the integration is more straightforward. A vertical strip would use \(dA = (1 - y^{\frac{1}{3}})\,dx\).
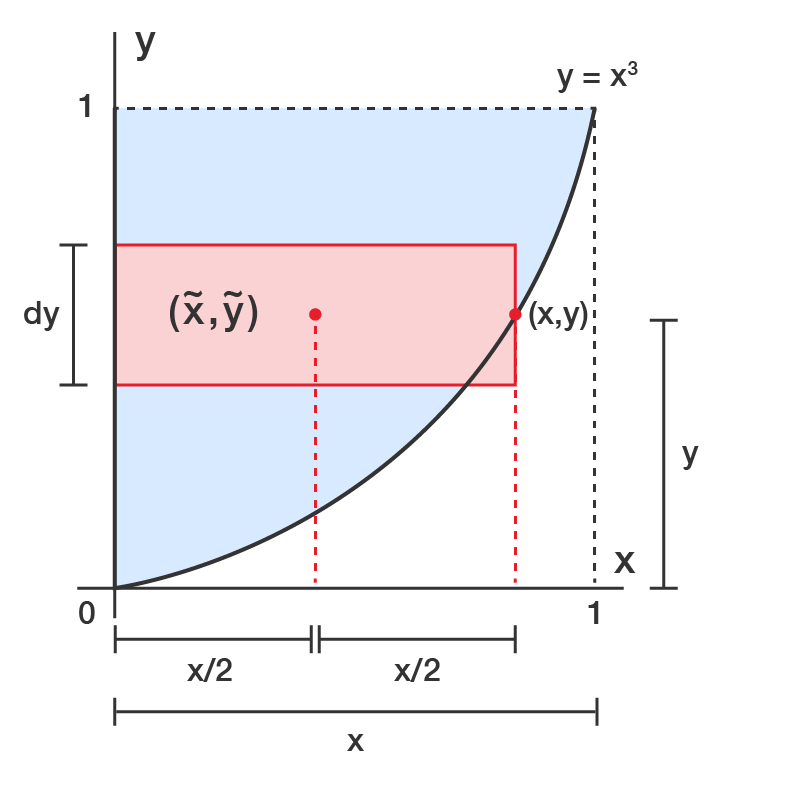
The curve is \(y = x^{3}\), so \(x = y^{\frac{1}{3}}\). We integrate from \(y=0\) to \(y=1\). Therefore:
\[\begin{align*} \int_{A}\,dA & = \int_{0}^{1}x\,dy \\[6pt]
& = \int_{0}^{1}y^{\frac{1}{3}}\,dy \\[6pt]
& = \left[\frac{3}{4} y^{\frac{4}{3}}\right]_{0}^{1} \\[6pt]
& = \frac{3}{4} \end{align*}\]
To find the \(\bar{x}\)-coordinate, we let \(\bar{x}\) equal to the centroid of the strip of area.
\[\begin{align*} \bar{x} & = \frac{x}{2} \\[6pt]
& = \frac{y^{\frac{1}{3}}}{2} \end{align*}\]
We then substitute to find \(\bar{x}\):
\[\begin{align*} \int_{A} \tilde{x}\,dA = & \int_{0}^{1}\left(\frac{y^{\frac{1}{3}}}{2}\right) x\,dy \\[6pt]
& = \frac{1}{2}\int_{0}^{1}y^{\frac{2}{3}}\,dy \\[6pt]
& = \frac{1}{2}\left[\frac{3}{5}y^{\frac{5}{3}}\right]_{0}^{1} \\[6pt]
& = \frac{3}{10} \end{align*}\]
Dividing this by the area:
\[\begin{align*} \bar{x} & = \frac{\frac{3}{10}}{\frac{3}{4}} \\[6pt]
& = \frac{3}{10}\times\frac{4}{3} \\[6pt]
& = \frac{4}{10} \\[6pt]
& = 0.4\,\text{m} \end{align*}\]
We repeat this for the \(\bar{y}\)-coordinate, where \(\tilde{y}=y\).
\[\begin{align*} \int_{A} \tilde{y}\,dA & = \int_{0}^{1}y\cdot x\,dy \\[6pt]
& = \int_{0}^{1}y\cdot y^{\frac{1}{3}}\,dy \\[6pt]
& = \int_{0}^{1}y^{\frac{4}{3}}\,dy \\[6pt]
& = \left[\frac{3}{7} y^{\frac{7}{3}}\right]_{0}^{1} \\[6pt]
& = \frac{3}{7} \end{align*}\]
Dividing this by the area:
\[\begin{align*} \bar{y} & = \frac{\frac{3}{7}}{\frac{3}{4}} \\[6pt]
& = \frac{3}{7}\times\frac{4}{3} \\[6pt]
& = \frac{4}{7} \\[6pt]
& \approx 0.57\,\text{m} \end{align*}\]
Therefore, the coordinates of the centroid are approximately \((\bar{x},\bar{y}) = (0.4,0.57)\,\text{m}\).
For composite areas made up of standard shapes (rectangles, triangles, circles) or elements, we can use a simpler weighted-sum method instead, since the centroid of each standard shape is already known.
\[\bar{x} = \frac{\sum (A x)}{\sum A}, \qquad \bar{y} = \frac{\sum (A y)}{\sum A},\]
where:
- \(A\) is the area of each element
- \(y\) is the vertical distance of each element's centroid from the \(x\)-axis
- \(x\) is the horizontal distance of each element's centroid from the \(y\)-axis.
Find the centroid of the composite area shown with respect to the \(x\) and \(y\) axes.
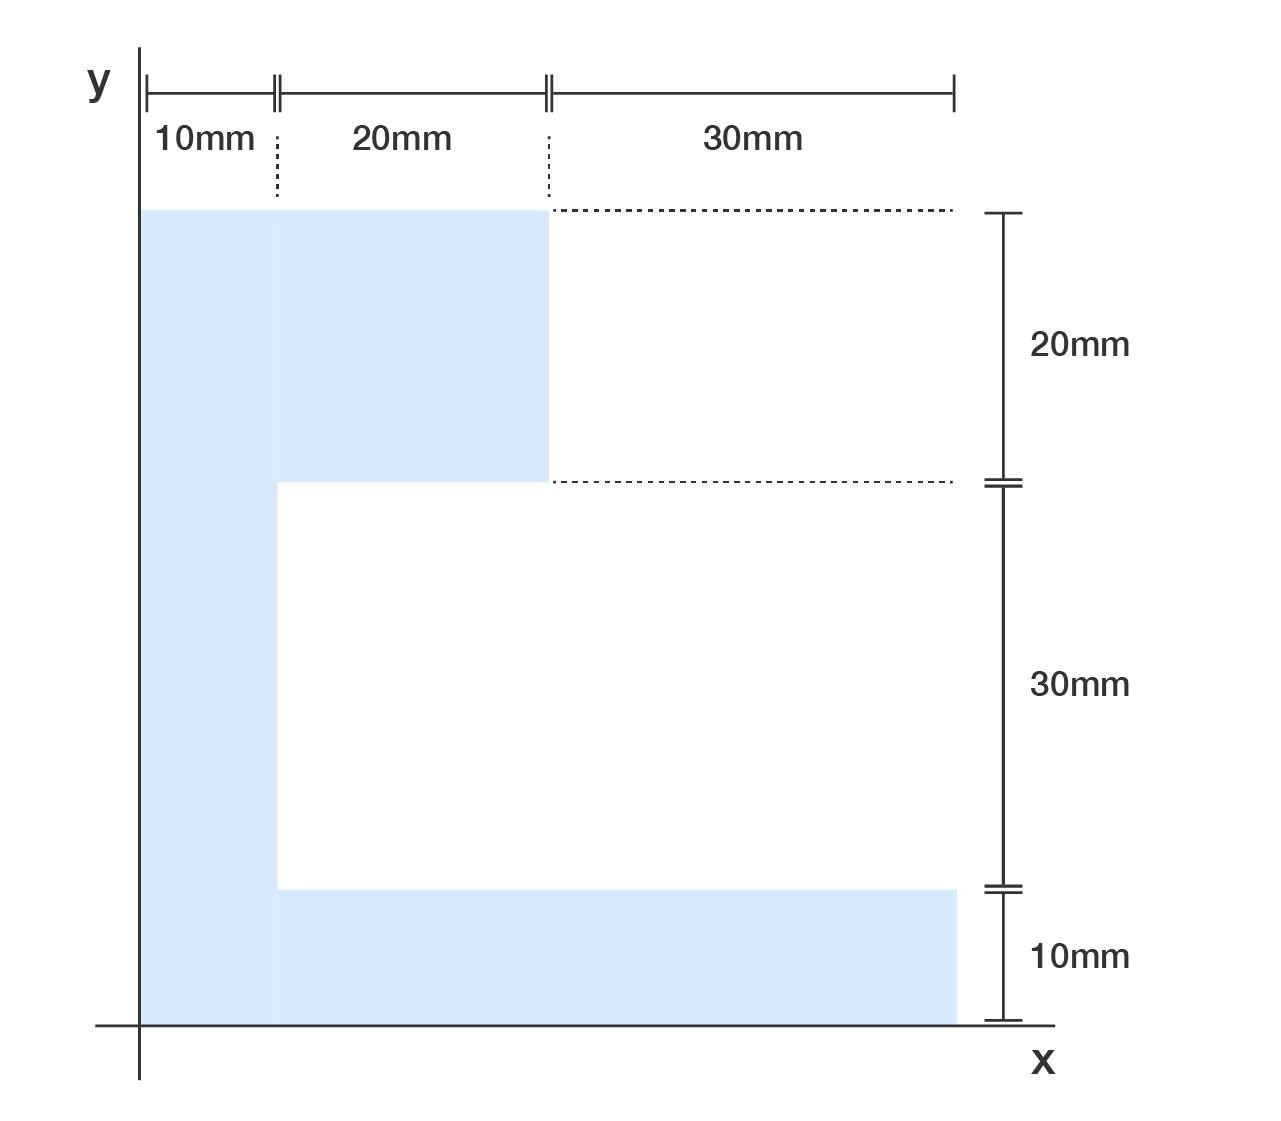
The L-shaped area can be divided into three rectangles: \(A_{1}\) (top-left), \(A_{2}\) (middle-left vertical strip) and \(A_{3}\) (bottom horizontal strip). For each element, we identify its area and locate its centroid. The centroid of a rectangle always lies at the intersection of its diagonals.
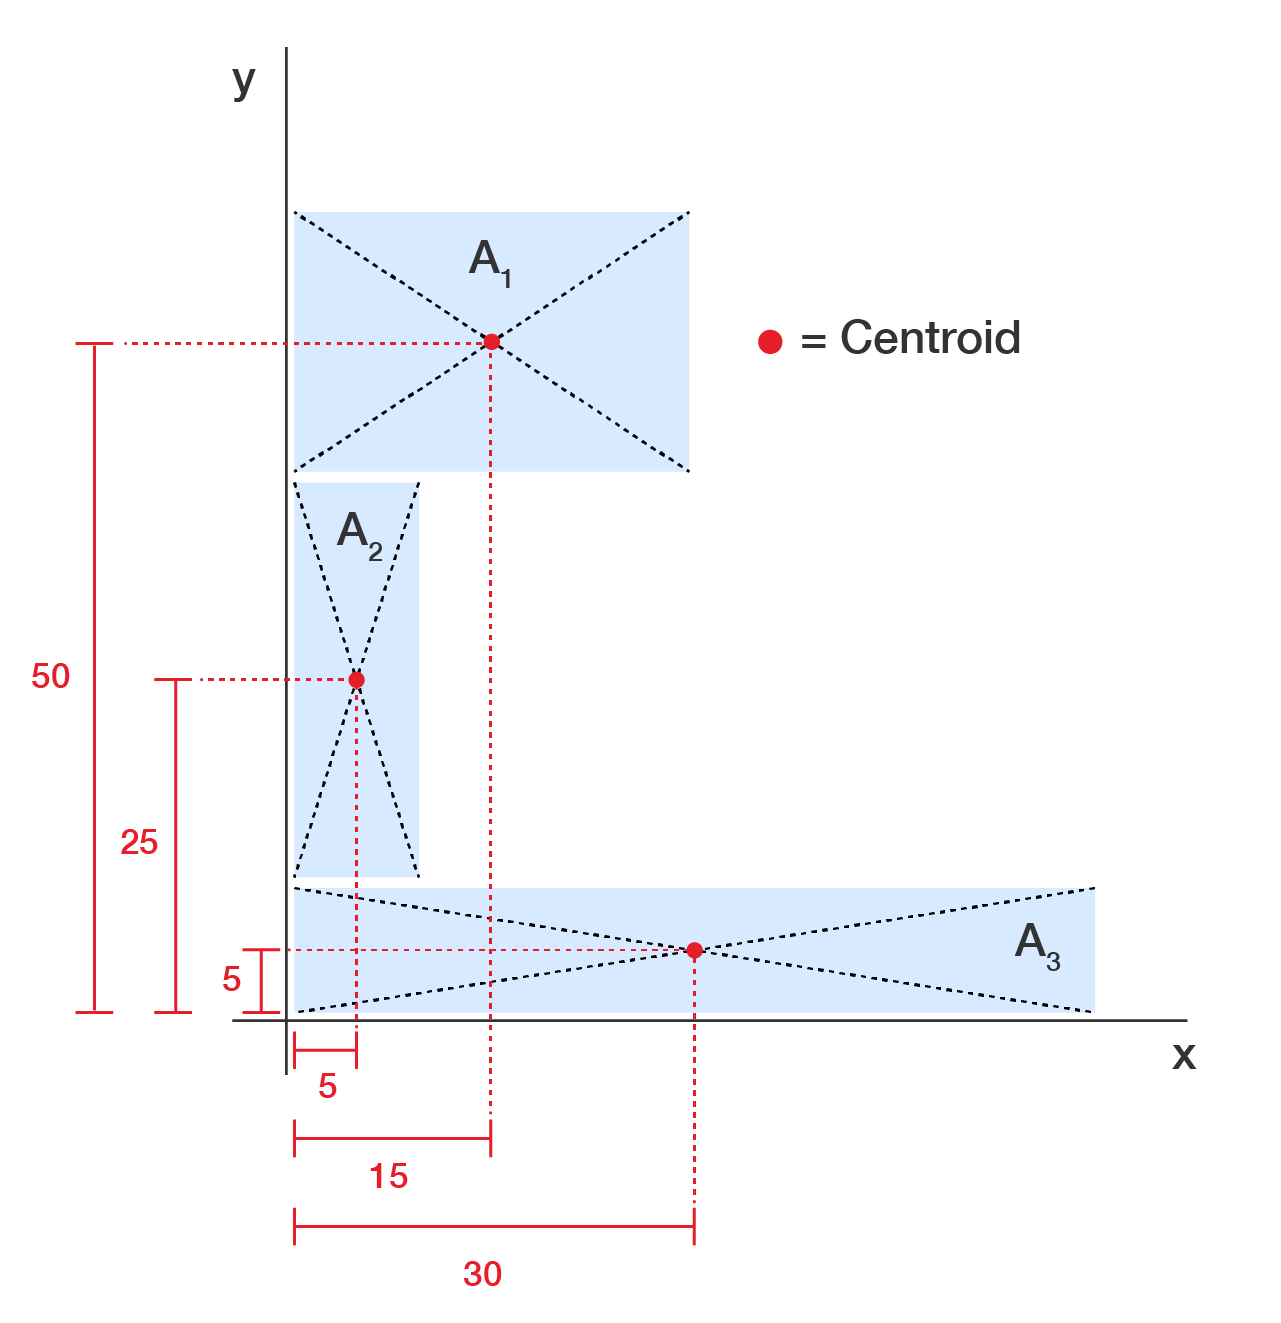
Reading centroid positions and dimensions from the geometry:
| Element | Dimensions | Area \(A\) \((\text{mm}^{2})\) | \(x\) \((\text{mm})\) | \(Ax\) \((\text{mm}^{3})\) | \(y\) \((\text{mm})\) | \(Ay\) \((\text{mm}^{3})\) |
|---|---|---|---|---|---|---|
| \(A_{1}\) | \(30\times20\) | 600 | 15 | 9000 | 50 | 30000 |
| \(A_{2}\) | \(10\times30\) | 300 | 5 | 1500 | 25 | 7500 |
| \(A_{3}\) | \(60\times10\) | 600 | 30 | 18000 | 5 | 3000 |
To find \(A\), \(Ax\) and \(Ay\), we sum each relevant column.
\[\begin{align*} \sum A & = 600+300+600 \\[6pt]
& = 1500\,\text{mm}^{2} \end{align*}\]\[\begin{align*} \sum (Ax) & = 9000+1500+18000 \\[6pt]
& = 28500\,\text{mm}^{3} \end{align*}\]\[\begin{align*} \sum (Ay) & = 30000+7500+3000 \\[6pt]
& = 40500\,\text{mm}^{3} \end{align*}\]
We can now apply the composite centroid formula. For \(\bar{x}\):
\[\begin{align*} \bar{x} & = \frac{\sum (Ax)}{\sum A} \\[6pt]
& = \frac{28500}{1500} \\[6pt]
& = 19\,\text{mm} \end{align*}\]
And for \(\bar{y}\):
\[\begin{align*} \bar{y} & = \frac{\sum (Ay)}{\sum A} \\[6pt]
& = \frac{40500}{1500} \\[6pt]
& = 27\,\text{mm} \end{align*}\]
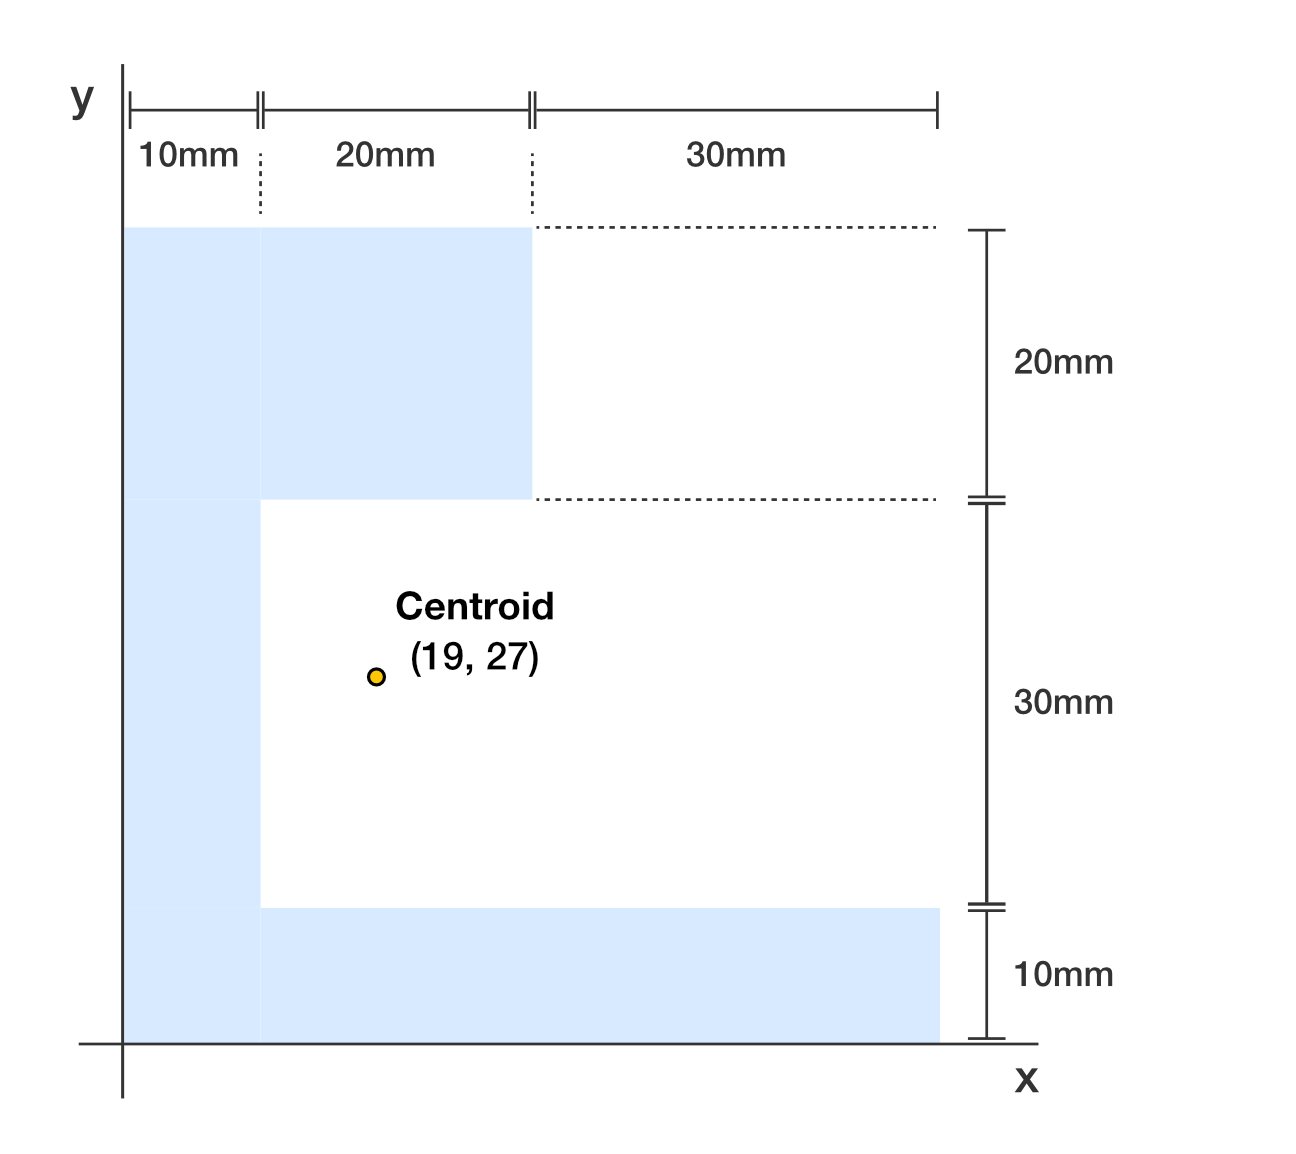
Therefore, the centroid of the composite area is at \((\bar{x},\bar{y})=(19,27)\,\text{mm}\).
Indigenous knowledges in physics
Not all boomerangs return to the thrower. Their shape decides this. Returning boomerangs curve back through a mix of three things: rotation about their centre of gravity, aerodynamic lift from their airfoil-shaped blades and gyroscopic effect. In symmetric boomerangs, area is spread evenly about the centre. This means the centroid sits at the geometric middle and helps stabilise the curved path home.
In 2025, researchers combined traditional knowledge from Wurundjeri Woi-wurrung Elders with scientific analysis of a non-returning boomerang, known as a wangim. It was recovered from a burial mound at Yarra Junction, on Wurundjeri Woi-wurrung Country East of Melbourne. Unlike returning boomerangs, a wangim is deliberately asymmetric: one end is heavier and wider than the other. This shifts the centroid toward that end, since the larger area contributes more to the first moment of area.
This asymmetry can be explained in two ways. The first is mathematical: more area on one end pulls the centroid toward that heavier end. The second is observational: the blade tip farther from the centre of gravity moves faster through the air, so it creates more lift. Both explanations describe the same thing, but they come from different starting points. The mathematical view uses formulas and needs no thrower present. The observational view is likely how the wangim's makers would have understood it – by throwing, watching and feeling which end pulled harder through the air, long before 'centroid' was ever a word.
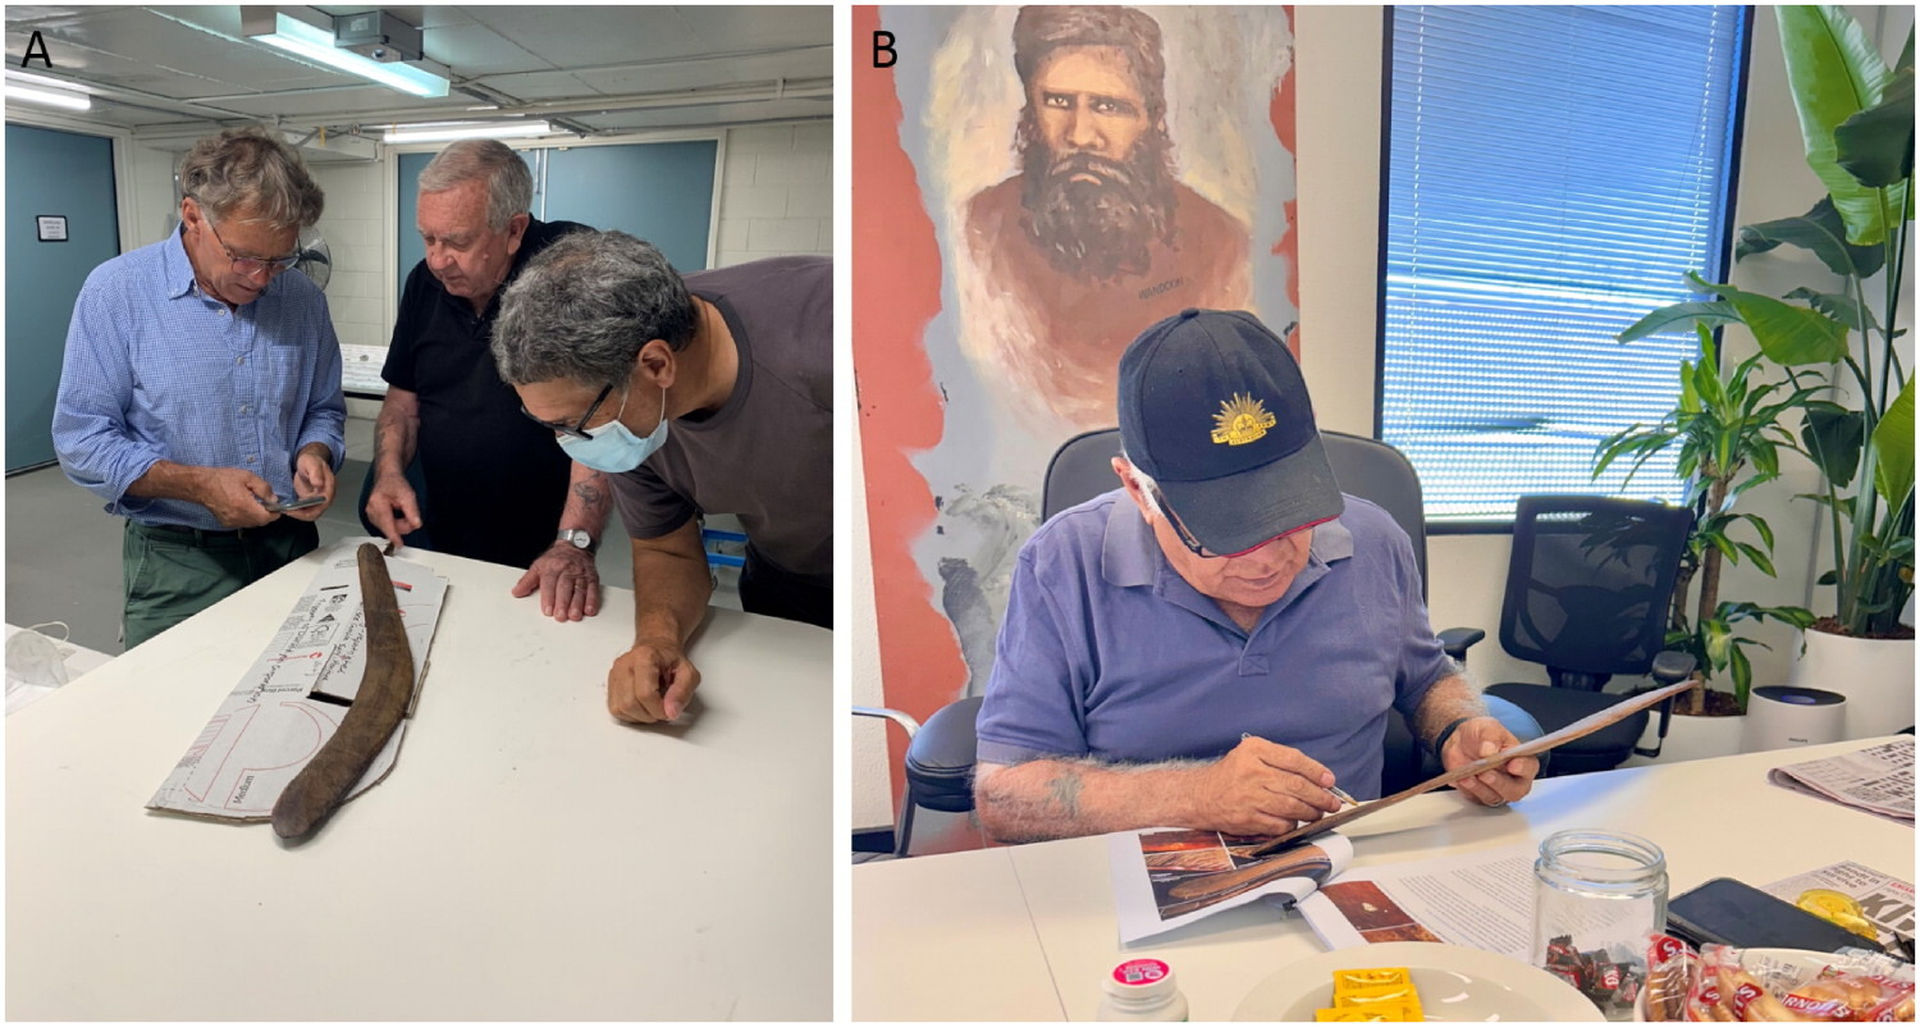
The study analysed the wangim’s shape, size, wear traces and residues, revealing a multifunctional tool. Its asymmetrical design was carefully crafted for its intended uses, which may have included knocking and stunning animals to the ground and the disarticulation of game. Traces of charring also suggest it may have been used in managing campfires. Together, the evidence shows that the wangim had a range of uses extending beyond hunting alone. Wangim continue to be made by Wurundjeri Woi-wurrung people, including Elder Bob Mullins, who passes this traditional cultural knowledge on to the next generation.
We would like to acknowledge and thank Dr Elspeth Hayes and the Indigenous Science Committee (School of Science, RMIT University) for their consultation, which has helped shape this example. For further information, please explore the following resource:
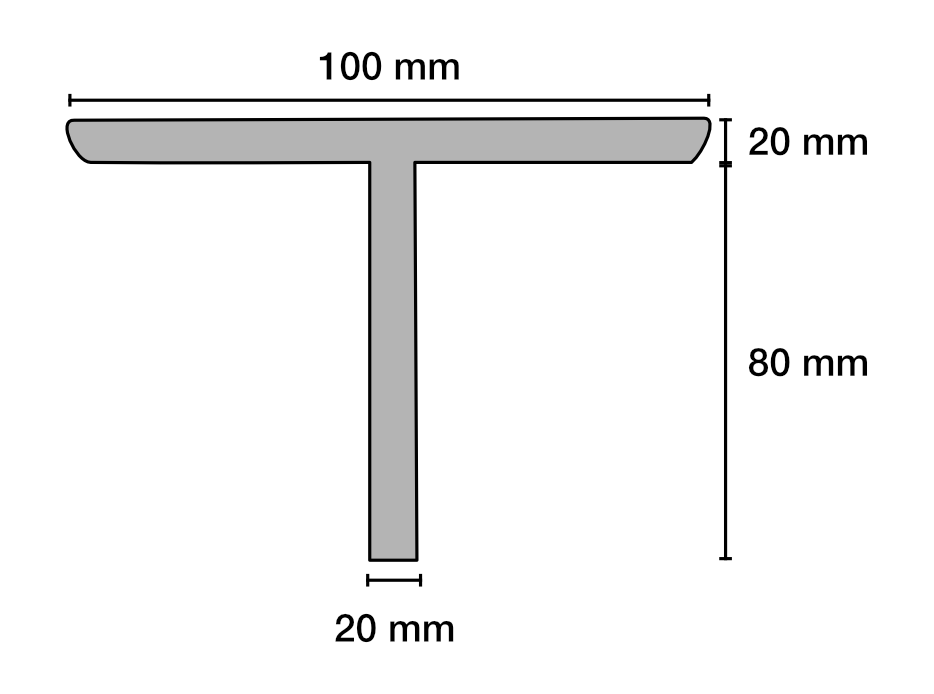
Images on this page by RMIT, licensed under CC BY-NC 4.0

RMIT University acknowledges the people of the Woi wurrung and Boon wurrung language groups of the eastern Kulin Nation on whose unceded lands we conduct the business of the University. RMIT University respectfully acknowledges their Ancestors and Elders, past and present. RMIT also acknowledges the Traditional Custodians and their Ancestors of the lands and waters across Australia where we conduct our business - Artwork 'Sentient' by Hollie Johnson, Gunaikurnai and Monero Ngarigo.
More information