Hand and power tools
The pedestal drill
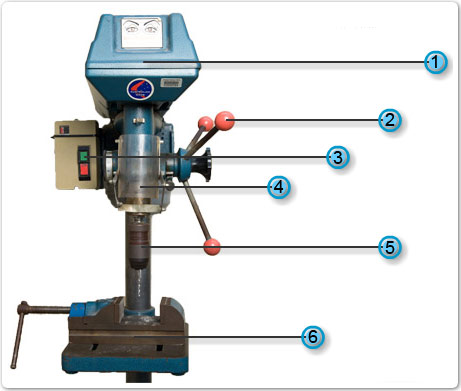
Parts of the pedestal drill are labeled in the following photo and then identified and explained in the text below.

1. Gear pulley housing
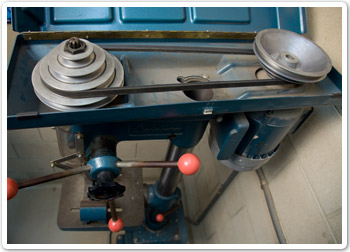
This housing contains belt driven pulleys. These connect the rotational motion of the electric motor to the drill chuck.
2. Drill handle
Turning in a clockwise direction by pulling down on the handle causes the drill bit to move in a downwards direction.
3. On / off switch
Used to turn the drill on or off. In addition to this switch, the drill can be turned off quickly using a large red button mounted at its base. Called the emergency stop, this button is designed to be operated by foot.
4. Shield
Helps protect the operator from flying metal.
5. Chuck
Used to hold the various sized drill bits.
6. Table
Used to support the workpiece. A vice can be placed or mounted on the table to hold the workpiece. The table height, and in some cases the table angle, can be adjusted.
Drill speed

Different drill speeds are useful when drilling different materials. The speed of the drill can be altered by changing the belt driven pulley ratio. Whenever changing the pulley ratio, make sure the drill is turned off or disconnected from the power supply.
Using the pedestal drill
A video shows the safe method of using a pedestal drill. The video stops at six stages and displays associated text. The stages and text are as follows:
1. Clothing
It is important to wear the correct clothing. Sleeve material must be tight around your arm and wrist. This prevents the possibility of it catching in the rotating drill or chuck. Horrific accidents can occur with high speed rotating equipment - take extreme care.
2. Clamp the work piece
Whenever possible clamp the work piece firmly using a vice. Clamping the material has a number of benefits. The work piece is less likely to move when you commence drilling. This means there is a better chance the hole will be drilled exactly where you want it. Also you won't have to hold the piece by hand and that limits the chance of being injured.
3. Clamping the work piece
Position the vice and work piece to avoid danger. If the drill should catch and jam, the work piece should be positioned so it will spin away from your body, not towards it.
4. Protect your eyes
Safety glasses are of no use on top of your head. Always wear safety glasses when using any rotating equipment.
5. Safety shield
The safety shield also offers some form of protection from flying material. Always place the shield in the correct position before turning on the drill.
6. Drilling
When you commence drilling pull down slowly and smoothly on the handle. Watch carefully to make sure the drill is in the correct position. You will feel and hear if the drilling process is not occurring correctly, if you are not sure all is correct release pressure on the handle and the drill will rise automatically. Turn off the drill then check to see if there is a problem.